
You’ve created a beautiful lawn view that enhances the beauty of your property. Landscaping lighting helps you enjoy the effort put into landscaping, creates a welcoming ambience and increases safety. Brilliance LED has compiled a step-by-step guide to help you accomplish your landscaping lighting goals.
10 Steps to Installing Your Low Voltage Landscape Lights
Low-voltage lighting is ideal because the lamps put out less heat, which is safer to integrate with plants. The main components of this system are light fixtures, low-voltage electrical cables and a transformer. The transformer reduces the indoor voltage, making it safer to install.
Before you start working on your project, be sure to comply with National Fire Protection Association regulations and review any relevant local guidelines.
1. Design the Lighting Layout
The first step to a successful landscaping lighting installation is to plan ahead. Where will you place the transformer and lighting fixtures, and how will you connect them?
- Walk around the outdoor space following the walkway.
- Identify any obstacles, such as electrical cables, water pipes or irrigation systems.
- Mark your obstacles with paint or tape.
- Identify the nearest power source where you’ll place the transformer.
- Note which areas need lighting for safety, such as pathways or steps.
- Map the areas or walls you want to light up and any focal points you want to create.
Use this information to create a diagram showing where the transformer, lightning fixtures and electrical cable will be.
2. Choose the Light Fixtures
Once you’ve identified how you want your outdoor illumination to look, it’s time to select the right fixtures for the pathway, walls, trees or outdoor decorations. You can choose from various light fixtures in colors, sizes and materials. LED landscape lighting is a great option for your outdoor space. These low-voltage solutions help you achieve your functional and aesthetic goals while creating a safer and more welcoming environment.
Your lighting fixture choice will determine the size of the transformer. Calculate the voltage and choose a transformer that matches those requirements.
3. Gather Tools and Materials
To install your low-voltage lighting system, ensure you have all the necessary tools and materials for the job. This includes:
- Safety glasses
- Work gloves
- Work boots
- Design layout
- Transformer
- Lighting fixtures
- Low voltage cable
- Lighting timer
- Tape measure
- Brass barrel connector
- Heat shrink
- Heat gun
- Allen screw
- Wire stripper
- Screwdriver
- Flat-blade shovel
Safety is essential when working on an electrical project. Always wear your protection equipment and make sure you know how to use the tools and materials to install landscape lights.
4. Assemble Lighting Fixtures
To install your outdoor lighting fixtures, you’ll need to assemble them first. Take each one out of the box, remove the tags and read the instructions to install the lamps. Depending on the type of lamps you choose, you might need additional tools to assemble your lighting fixtures.
5. Layout Lighting Fixtures and Electrical Cable
Now that you’ve assembled your fixtures, it’s time to follow your layout design.
- Position your lamps according to your design map.
- Place pathway fixtures as close to the walkway as possible.
- Make sure pathway fixtures have the same distance between them.
- Follow the layout of the fixtures with the electrical cable starting at the transformer.
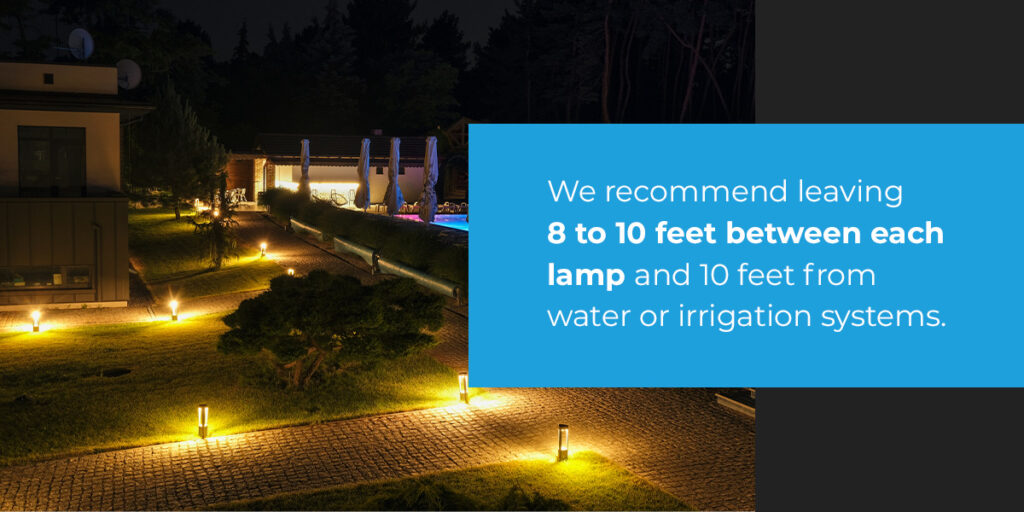
Avoid the obstacles you’ve marked on your design layout. We recommend leaving 8 to 10 feet between each lamp and 10 feet from water or irrigation systems. Also, leave around 5 feet of electrical cable to move around your fixtures if plants grow or you redesign in the future.
6. Make the Electrical Connections
After you’ve placed the fixtures and electrical cable in their proper spots, it’s time to make the connections.
- Find the connector halves at the bottom of the lamps.
- Using wire strippers, cut the electrical cable and remove the insulation.
- Connect the electrical wire to the lamp’s connectors.
- Stick the wires inside a brass barrel connector, and use an Allen screw to tighten them up.
- Slide the brass barrel into a heat shrink.
- Heat up the heat shrink.
Make sure you connect the right cables and that the brass barrel is properly placed inside the heat shrink to waterproof your connection.
7. Install the Transformer
To install the transformer, you’ll need to find a power source away from water or irrigation systems. A transformer must be connected to a ground fault circuit interrupter (GFCI) electrical outlet. After you’ve identified a power source with the right characteristics:
- Place the transformer on a surface that can withstand the heat it produces.
- Use wire strippers to cut the insulation rubber half an inch from the end.
- Place wires under the terminal screws on the transformer’s bottom of the transformer.
- Tighten the screws.
Before installing your transformer, double-check that the transformer supports the wattage of your lighting system.
8. Test the Lighting System
After you’ve connected your lamps to the electrical cable and installed your transformer, it is time to test your lighting system. Turn on your transformer, walk around the area and ensure every fixture is lit up. Wait until night to see the lighting effects from inside and outside the house or building. Make any adjustments to ensure you illuminate the right walls, plants, focal points and pathways.
9. Set the Timer
Set a timer if you want the lights to come up at dawn and reduce electricity bills. Connect the timer to the transformer, and set the times according to your preference.
10. Bury the Electrical Cable
After you’ve made sure every fixture is functional and placed in the right spots, it’s time to bury the electrical cables:
- Use metric tape to dig a trench 12 inches from the pathway edge.
- Use a shovel or blunt tool to dig a 4- to 6-inch deep trench.
- Lay the electrical cable into the trench.
- Cover the electrical cable with soil, leaving it exposed where the fixtures are placed.
- Install the fixtures into the ground.
- Visually inspect the fixtures and make sure they are properly connected.
- Reseed and water for rapid grass growth.
During the next weeks, keep monitoring the lighting system. Replace any broken lamps, adjust the timer or fix any fixtures.
Find a Brilliance LED Distributor Today!
Brilliance LED has been lighting home walkways and outdoor spaces since 2008. We provide lighting solutions that accentuate any building’s beauty and enhance outdoor safety. Brilliance LED lighting solutions are:
- Cost-efficient: LED lights are low-voltage, so they use less electricity than conventional lamps.
- Durable: LED lights have fewer breakable parts, helping them last longer and be perfect for outdoors.
- Bug-resistant: LED lights emit less ultraviolet (UV) light and heat, making them less attractive to bugs.
Search for a distributor near you to light up your space!

